
Food photography tips for beginners – complete guide
Are you new to food photography? The best food photography tips for beginners are bundled in this beginner’s guide to food photography. To give you a quick start to food photography. After reading these food photography tips and tricks, you know the most important things for starting out with food photography and you will know how to take a great food photo.
Do you want to make drool-worthy pictures of food for your social media, food blog, or maybe clients? You are in the right place. In this beginner’s guide to food photography, all the best food photography tips and tricks are bundled so that you can have a good start in your food photography journey. You can see this guide as an introduction to food photography.
Food photography is harder than it seems. It isn’t just making a quick photo of food. A good food photo consists of a lot of components, like exposure, food styling, backdrops, lighting, editing, props, camera angle, equipment, and compositions. You need to think about all these components before making a food photo.
Luckily we cover every aspect of food photography and share all the food photography tips for beginners. All you need for food photography is a camera, natural light, some props, and food. You can make all the photos in your own home and you don’t need a studio for food photography.
What is food photography?
Food photography is a type of still-life photography in which the photographer captures food or beverages, making them look appealing. The goal of food photography is to capture the food or beverage in the most appealing way possible. As a food photographer, you need to showcase the uniqueness of a specific dish and provoke a certain emotion.
Appendix Food photography tips for beginners
- Turn off your kitchen lights
- Learn how to shoot with natural light
- Learn how to shape the light
- Use the right equipment
- Shoot RAW in stead of JPEG
- Learn to shoot manual
- Use the right camera angle for your food
- Use the right props and the right amount of props
- Choose the right backdrop
- Don’t forget the food styling
- Use layers in your food photography setting
- Make a beautiful mess
- Think about your composition
- Focus on the hero
- Learn how to edit
Food photography tips for beginners
1. Turn Off Your Kitchen Lights
One of the biggest mistakes I see by beginners is shooting with their kitchen lights on. This gives a typical yellowish tone to the photos. The food looks ugly and unappetizing. So if you are going to photograph food, the first thing you have to do is to turn off all the lights in the room.
Another food photography tip for beginners is to NEVER use the direct flash of your phone or camera, this makes the food look awful and flat.
2. Learn How To Shoot With Natural Light
Light is the most important thing in food photography! Light can make or break your photo! Always try to shoot with natural light with all your other lights out. For food photography, you need to understand the light and know how to control the light. In other words, you have to learn how to read the light.
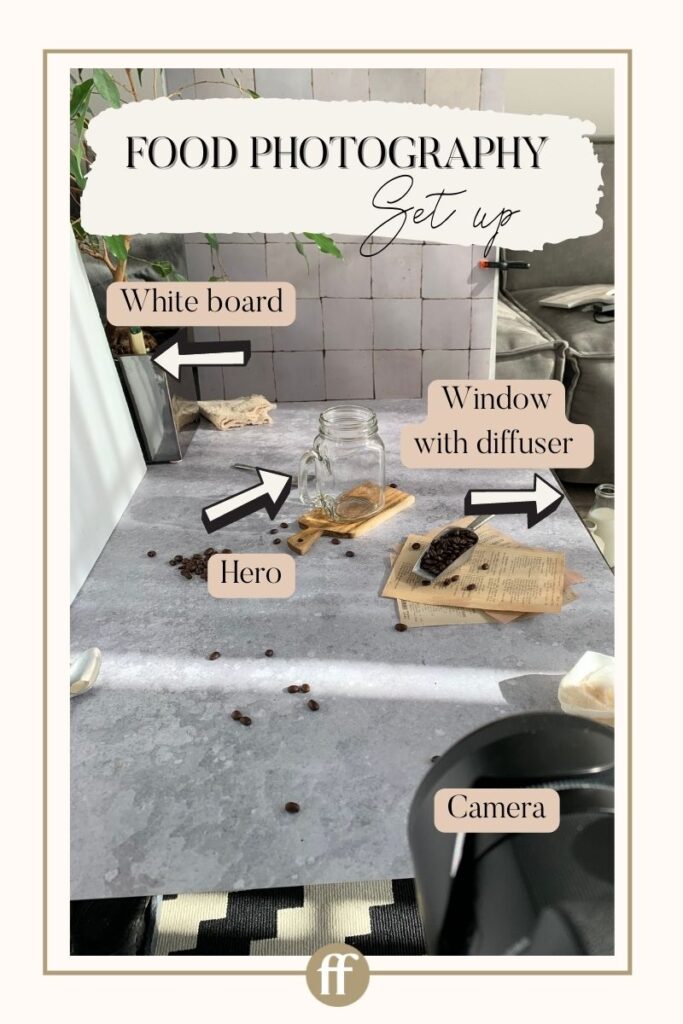
If you want to photograph food the best way is to stay close to one window, so the light is coming from one direction. The window becomes the light source of your food photo because the window determines the direction of the light. Check out the windows in your home, look for a large window where you have enough space to set up your food photography set.
Look at the light and ask yourself the following questions – what time of day is it? Are there any clouds or is it sunny weather? Are there hard or soft shadows? Is the lig it hard or soft light? Where is the light coming from? Is it summer or winter? All these circumstances affect how the light falls on your food photography scene.
Direction of the light
There are two directions of the light that are common for food photography: side lighting and backlighting. Light from the front, which is used a lot for portrait photography, is the worst light direction for photographing food. It makes the food look flat and lifeless.
- Sidelight – is light that is coming from the left side or right side from your food. Side light gives a beautiful highlight and shadow to the food, and makes the food more 3D. Most used angle for food photography. You can use this this direction for every food and beverage.
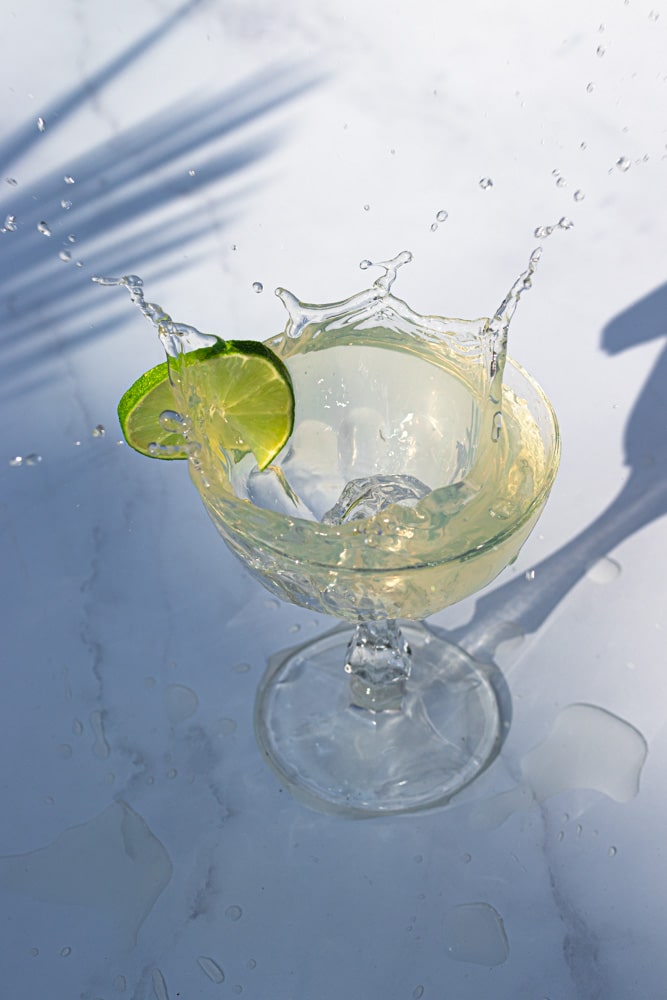
- Backlight – is the light is coming from behind your food or subject that you photograph. Backlighting creates beautiful highlights and it’s therefore used a lot for photographing drinks and soups.
Let’s look at some examples of side and backlight.
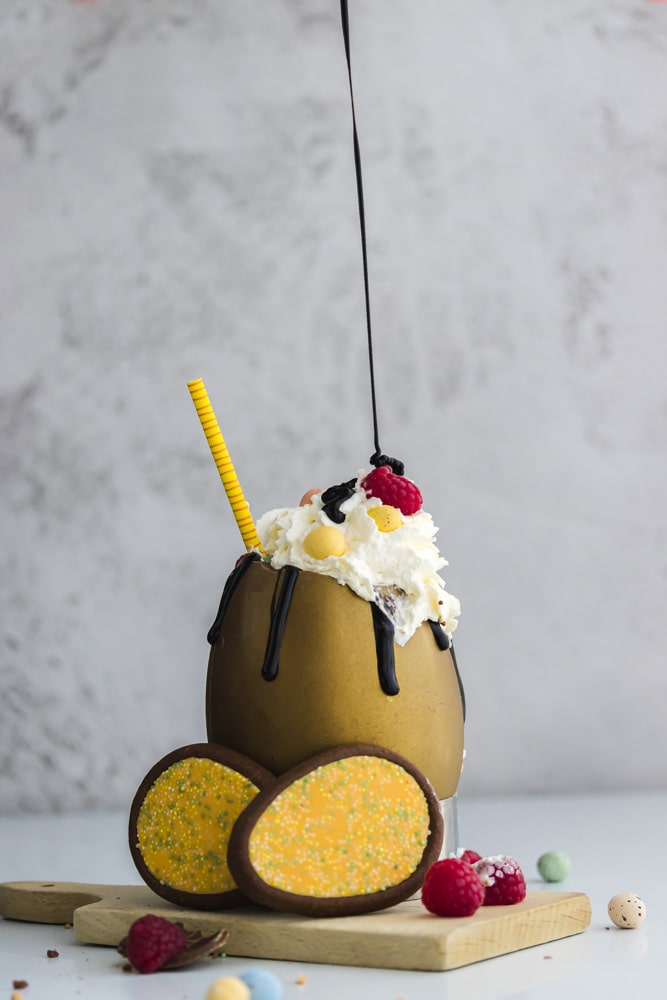
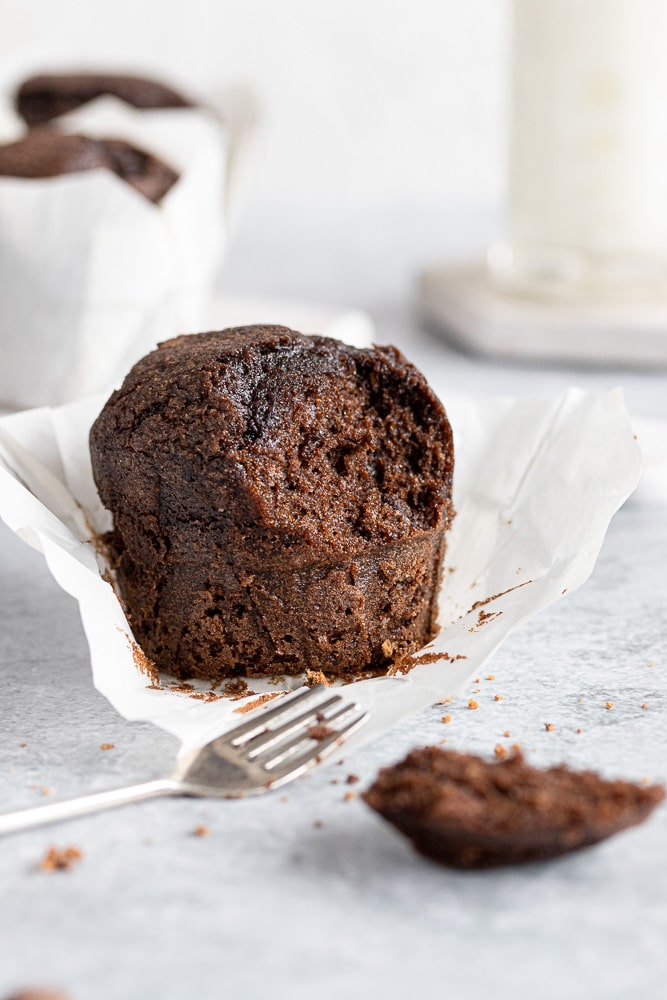
Hard light
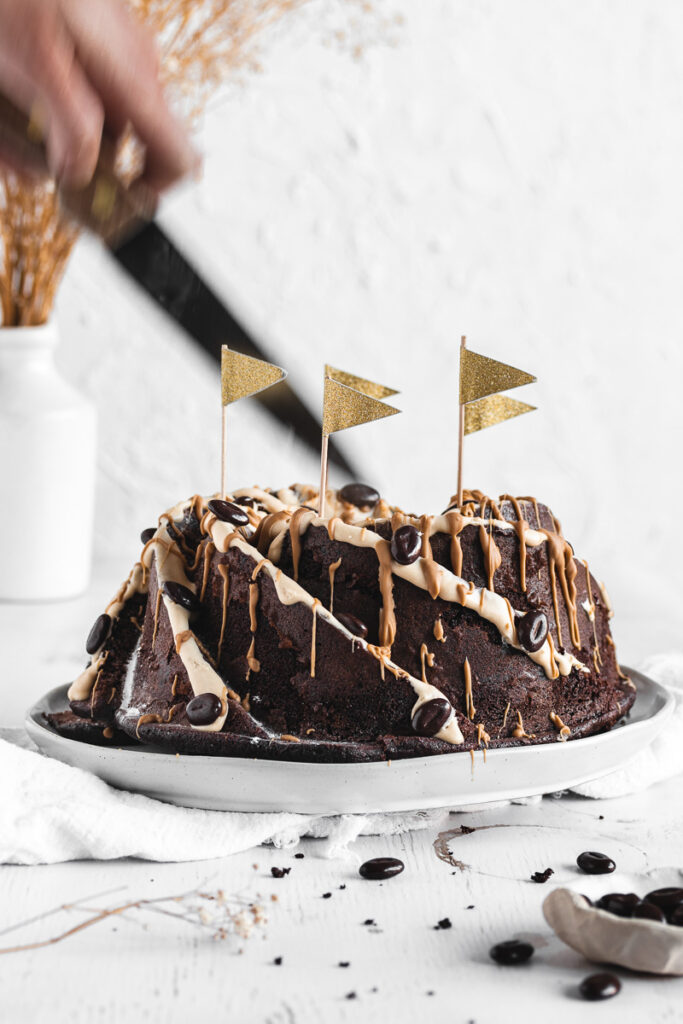
Look at the photo above and look at the light and shadows. The photo above is a photo with hard light. The light is coming from the left corner on a sunny day (backlighting).
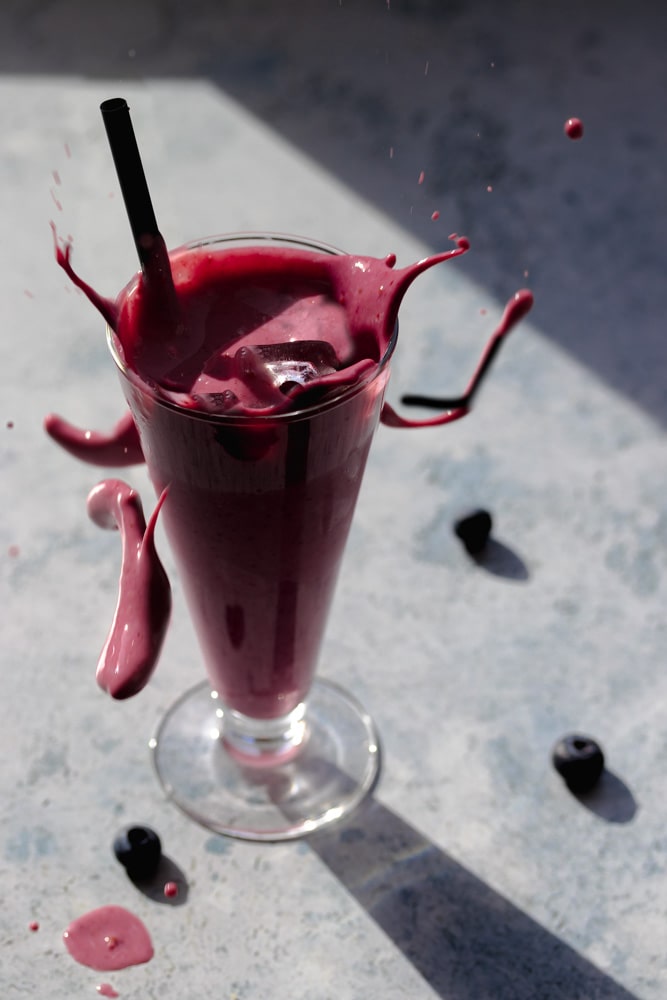
Hard light results in a photo with high contrast and hard shadows. It is used a lot for dark and moody photos and adds a little bit of drama to your food photo. It depends on which country you live in but you will find hard light on a sunny day (in the summer). Often in the middle of the day, where the radiation of the sun is at its strongest.
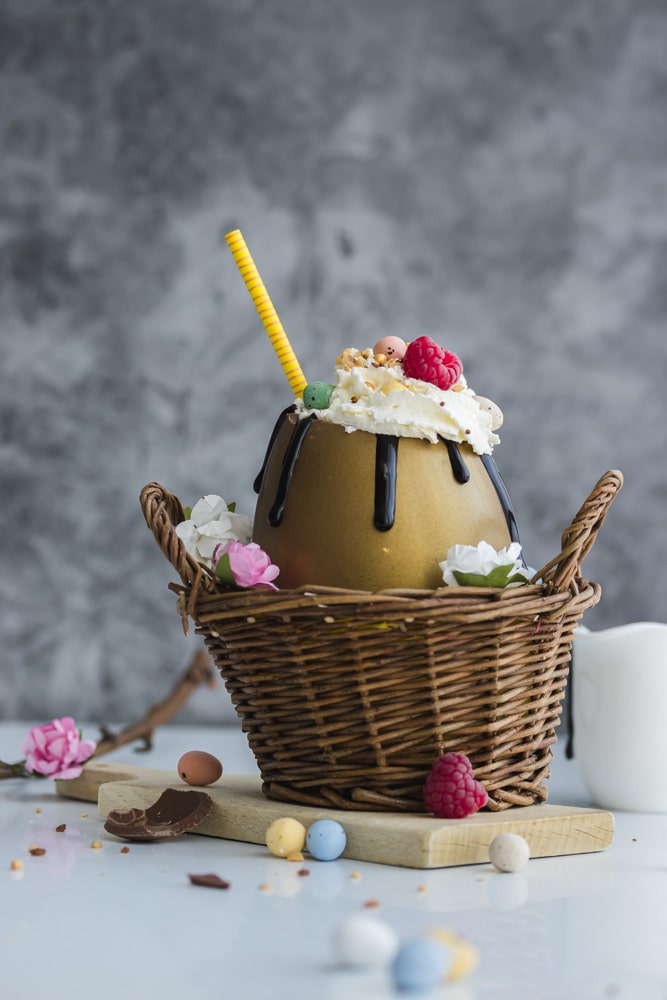
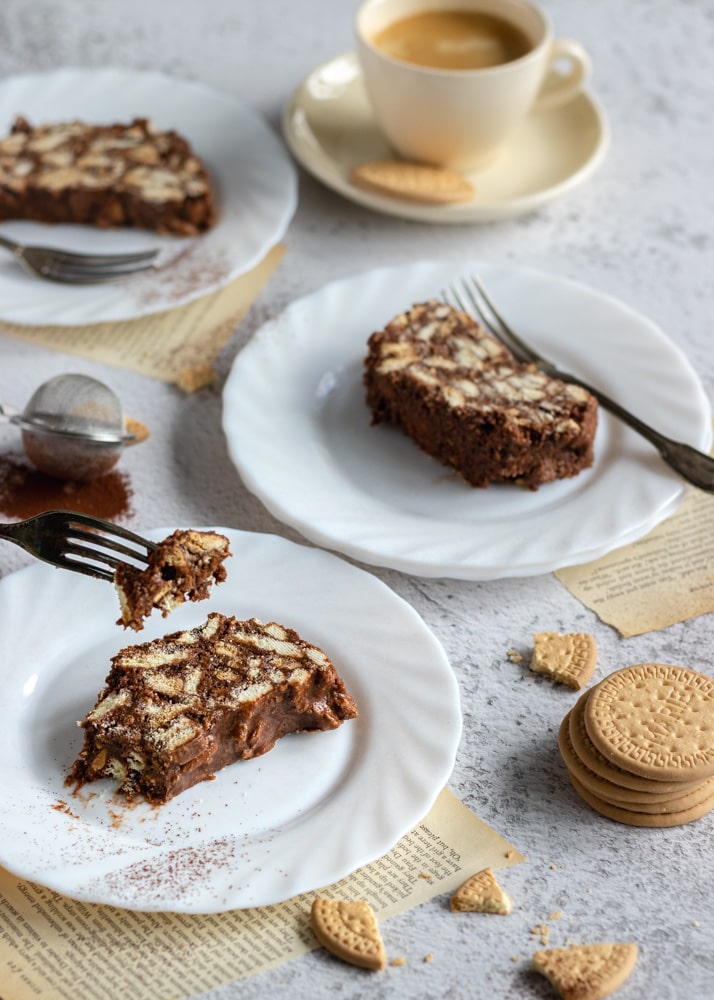
Soft light
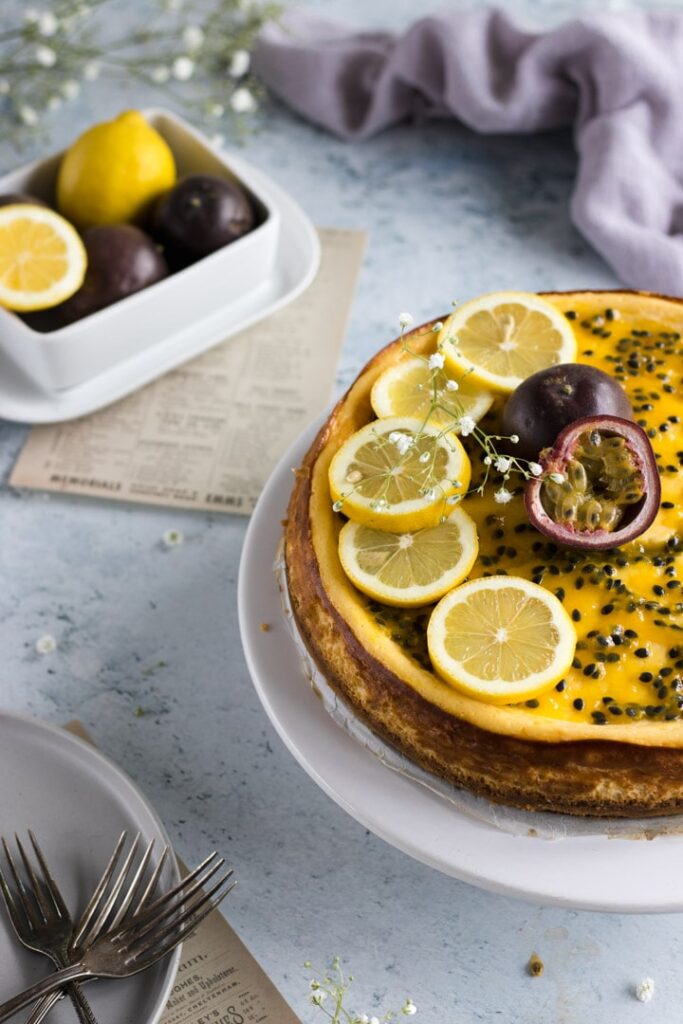
Look at the light and shadows of the food photo with soft light above. The light is coming from the right side on a cloudy day.
Soft light results in a photo with low contrast and soft shadows. This is often used in bright and airy photos. You can find soft light on a cloudy day. Also in the winter when the sun isn’t that strong anymore you can find soft lighting.
Which direction of light you should choose depends on the subject what you want to photograph and what emotion you want to provoke. There is no right or wrong. But always keep in mind that you want to show the food in the best way possible.
artificial light
Besides natural light, you can also shoot with artificial light. But I recommend you to be familiar first with natural light before making that investment.
3. Learn how to shape the light
Now you know how to read the light and how to shoot with natural light. The next thing you learn is how to shape the light in the way you want it to be. Think about what style you want to photograph and if you want to photograph it with hard or soft light.
Diffuser
What if it is a sunny day with hard shadows and you want your photo to have soft light? That’s possible, you can diffuse the light with a large diffuser or with some sheer white curtains. A diffuser should be placed between the light source and the subject. So it can block some of the sunbeams.
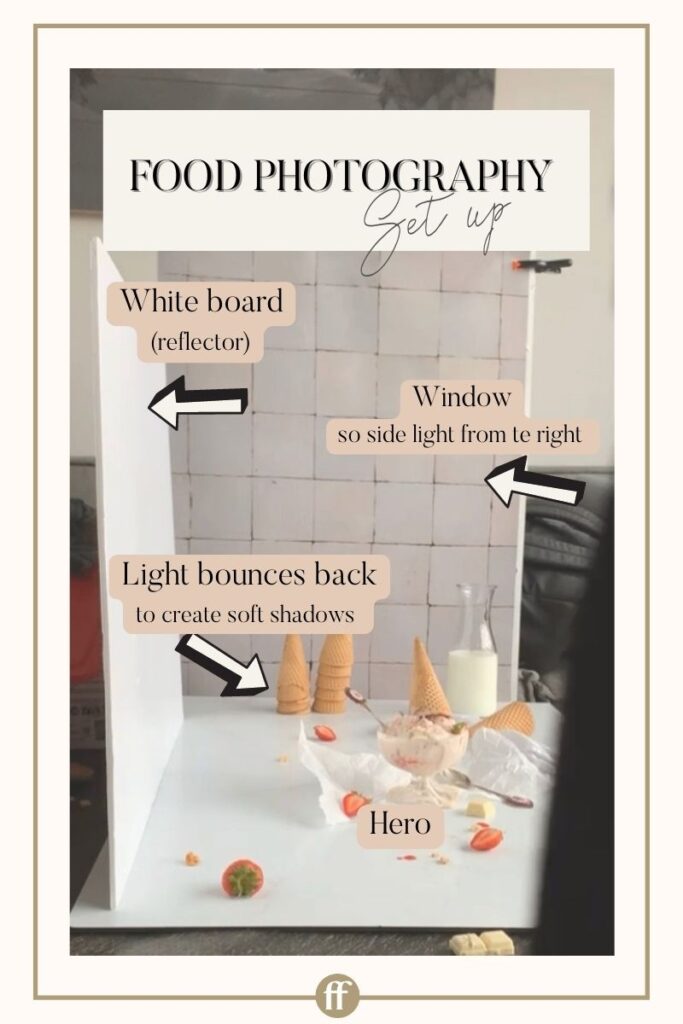
Reflector
A reflector is used in food photography to bounce the light back in a certain direction and to reduce the shadows. A reflector should be placed at the opposite side of the light source. If your light is coming from the left side of your food scene, you have to place the reflector on the right side of your food scene.
Reflectors are used to make a photo brighter. With a reflector, you have control of the contrast of a photo. In food photography, white and silver reflectors are used. I mostly use white foam boards as reflectors that I buy from craft stores. By using a black foam board you can bring out more shadows.
4. Use the right equipment
Camera
For beginners, I advise you to start out with what you have. So start shooting food with your phone, so that you can learn the basics of food photography first.
When you think that it is time to upgrade, I advise buying a second-hand camera. You can find a lot of second-hand cameras for a small price online. In this way, you don’t have to spend a lot of money on your new hobby, in case it doesn’t work out. Second-hand cameras are great for learning to understand your camera.
There are two kinds of cameras that are used the most for food photography: DSLR cameras and mirrorless cameras. In those cameras, there are two types of sensors: full-frame or crop sensor (APS-C).
If you have a small budget, I advise you to spend your money on good lenses instead of a good camera body. Because a different lens can have a big impact on the quality and the aesthetic of a photo, a different camera doesn’t.
Start out with a 50mm f1.8 lens, that creates a beautiful bokeh (unsharp background) in your food photos. It is the best entry-level prime lens for food photography with a small aperture that is perfect for shooting food photos and portraits. If you have a choice, don’t buy the kit lens of your new camera as you will never use this for food photography.
5. Shoot RAW in stead of JPEG
One of the biggest tips I can give you when you are shooting with a DSLR or mirrorless camera is to shoot in RAW format. RAW provides far more image information than JPEG allowing you to capture more detail and greater dynamic range. This gives you so much more control for editing a photo. Furthermore, the RAW format has more options for correcting exposure and white balance issues. You also won’t lose any data while editing, because you save it as a JPEG after editing. This means that the original RAW file stays unharmed.
6. Learn to shoot Manual
If you are shooting with your phone you can skip this one and go to the next food photography tip for beginners – use the right camera angle for your food
Most beginner photographers start out with shooting on the Automatic mode. If you shoot in automatic mode, the camera determines all the settings for you and you have no influence on this. But you want to have your own control over your camera and your camera settings. Learning how to shoot with the Manual stand gives you more freedom.
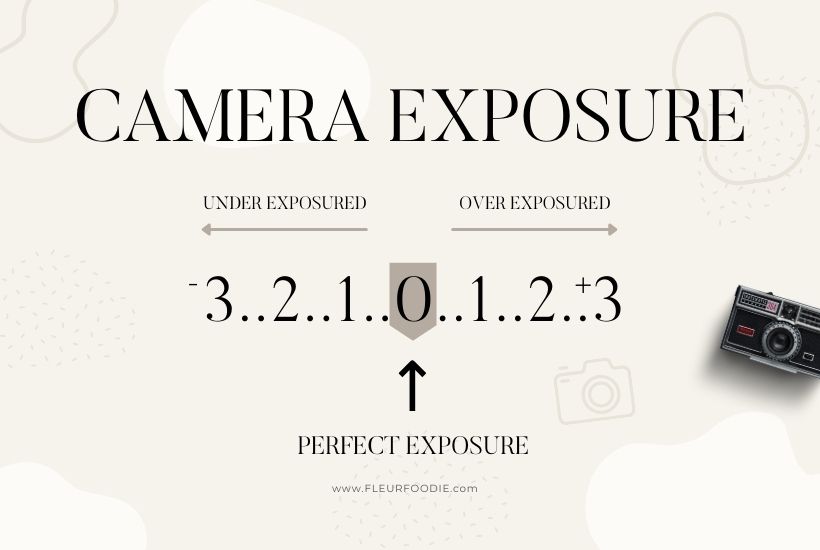
You have to know how you can set up your camera with the right exposure. In photography, exposure is the amount of light that reaches your camera sensor. It is a crucial part of how bright or dark your pictures appear. Shutter speed, aperture, and ISO all affect the exposure of your photo. Shutter speed, aperture, and ISO all affect the exposure of your photo.
Aperture
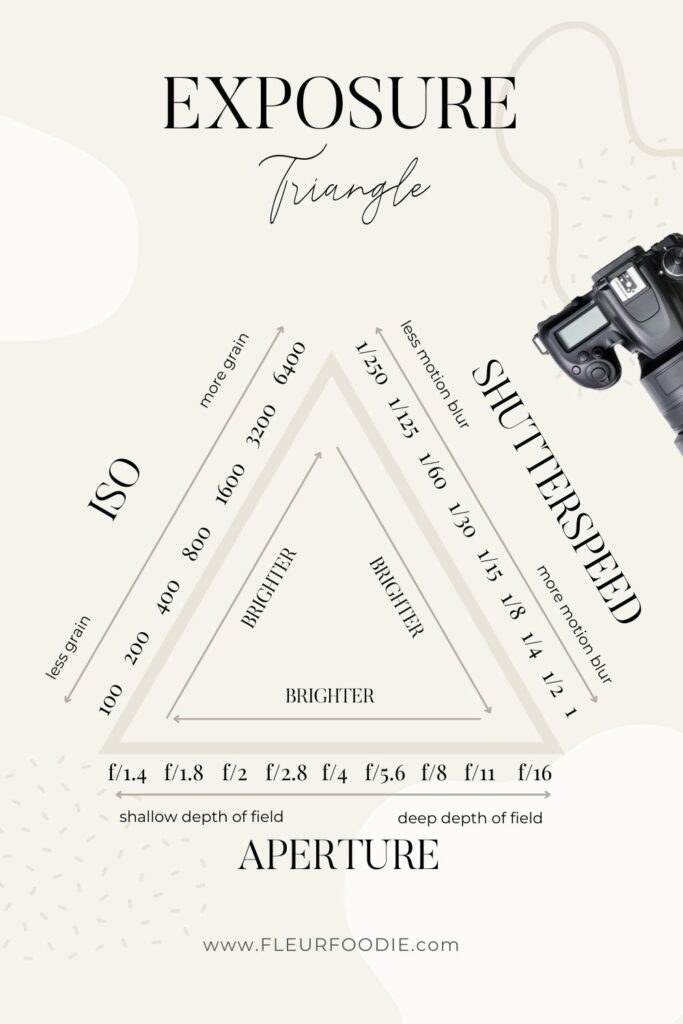
Aperture is the opening in the camera lens. A larger hole allows more light to hit the sensor, lightening your photos. A smaller hole allows less light to hit the sensor, darkening your photos. The aperture has an effect on two things – exposure and depth of field. A large aperture like F/1.4 creates a blurry background. In food photography, we love blurry backgrounds because it makes all the attention go to the sharp subject in your photo (your food).
I always try to shoot with a shallow depth of field because I love a burry background. That is why I always shoot with an aperture between f/1.4 and f/5.6.

Shutterspeed
The shutter speed determines how long the camera sensor has to catch the incoming light and take a photo. The slower the shutter speed, the more light enters, and a faster shutter speed means less light. The adjustable shutter speed range on most cameras varies from 1 / 4000th of a second to a time of 30 seconds. The shutter speed has an effect on two things – exposure and capture motion.
The shutter speed determines whether the movement of your subject is frozen. With a fast shutter speed (higher than 1/250), movement will be frozen and the movement will be displayed in focus. For capturing action you often need a fast shutter speed.
With a slow shutter speed, the movement of the subject is depicted. The moving part in your photo will be blurred because the subject is moving at a slow shutter speed. Read more about shutter speeds in my blog post on how to photograph great action shots.
I always try to have my shutterspeed set at a minimum of 1/200 shooting handheld to avoid camera shake in my photos. If you shoot with a tripod you can also shoot with a slower shutterspeed to make the photo brighter.
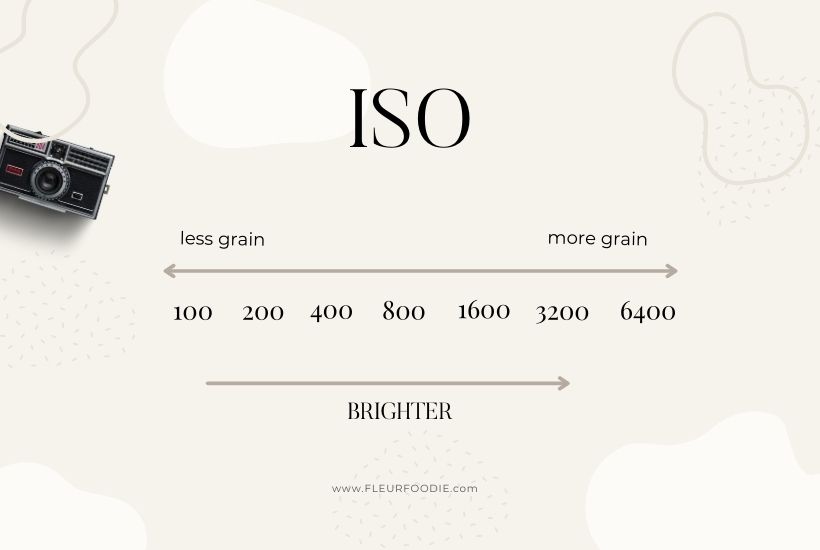
ISO
In photography, ISO is a camera setting that will brighten or darken your photo. If you increase your ISO number, your photos will become brighter. Why shouldn’t you use your ISO to make your photo brighter? The higher the ISO number you take the more grain you get in your photo. For food photography, grain is NOT beautiful and makes the food look awful.
I always try to have my ISO set at 100, and use my shutter speed or aperture to brighten up my photos. When the light conditions are bad and I don’t shoot with a tripod, I have to take a higher ISO. But I won’t get higher than 800 or 1600.
7. Use the right camera angle for your food
There are three camera angles for food photography – 45 degrees, straight on, and overhead. Look at what kind of food you are going to photograph and which angle emphasizes the food the most.
1. 45 degrees
Shooting from 45 degrees is the same angle as people normally see the food. It is a versatile angle because you can see different sides of the food. You can (almost) use this angle for every dish!
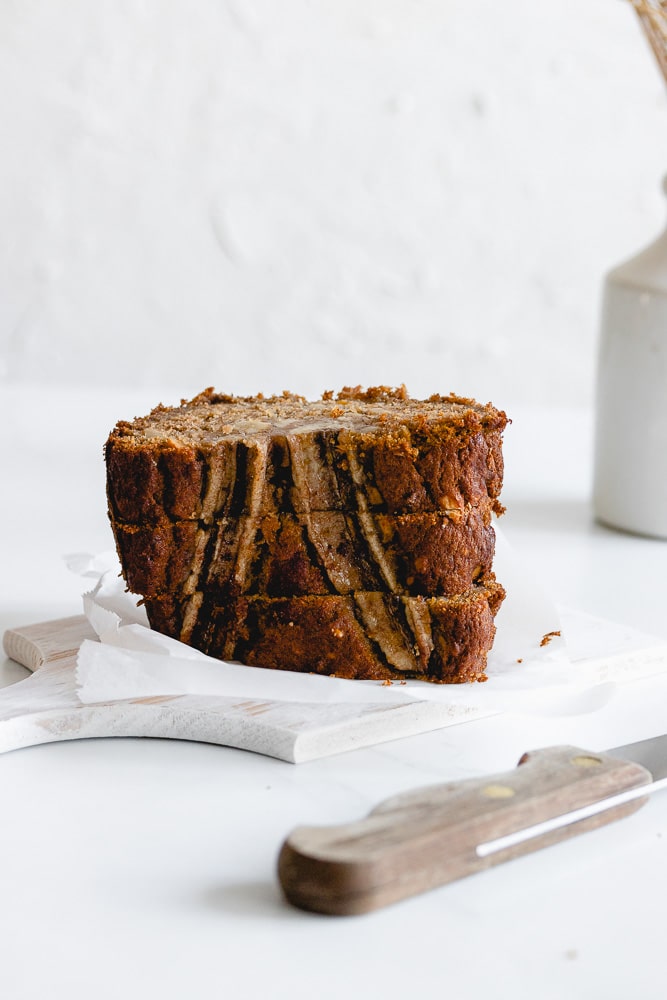
2. straight on
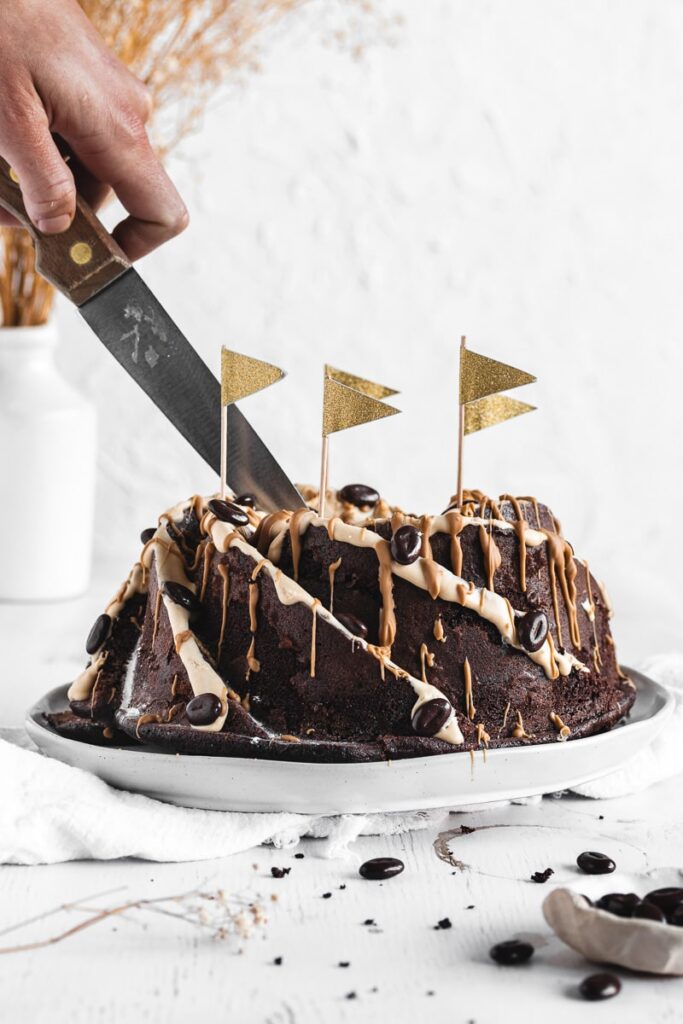
Straight on or 0 degrees, is the best angle for tall dishes. This is also the perfect angle for action shots. This angle works perfectly for burgers, tall layered cakes, sandwiches, any stacked food, and tall glasses.

3. Flatlay
Overhead or flatlay is a shot taken from above. An overhead shot emphasizes the shape of the food. It is perfect for flat foods like pizzas, bowls, soups, and pies. This is also a great angle for a table scene.
8. Use the right props and the right amount of props
Food photography props are all the objects that are used to support the hero in your food photo. Props are used to enhance your food photo. It can be the cutlery, the napkin, the plate, the measuring cups, the rolling pin, the flower that all contribute to telling the story. You can find props everywhere, you can find food photography props in stores, online, in thrift shops, or in nature.
It is important that you find a balance in food photography props. The food photography props should not steal the attention of your food. Anything shiny tends to look terrible on camera. Therefore use matte (vintage) cutlery, matte ceramics, and textured glasses they look better on a photo. For you as a starter photographer, I advise you to start out with neutral colors. Look for props with texture.
9. Choose the right backdrop
Most of the backdrops that are used in food photography are fake. Food photographers build up their food photography scenes with their own photography backdrops.
This is something that you might not expect but backdrops have an enormous impact on the outcome of your food photo. So choose your backdrops wisely. Invest in backdrops with a neutral color. Use light and white neutral colors if you want to achieve a bright and airy style in your food photos. Use darker colored or wooden backdrops if you want to achieve a dark and moody style. You can buy food photography backdrops online or you can make your own food photography backdrop.
Always use a contrasting backdrop for shooting action. For example, when you are capturing icing sugar, make sure the backdrop you choose is dark. So the icing sugar pops. It is important that you choose the right backdrop that fits your food story and your color scheme. If you think that a certain background isn’t the best option for your food photography setting, you can always change your backdrop.
10. Don’t Forget The Food Styling
As we said before the goal of food photography is to photograph the food in the most appealing way. Don’t make the mistake to make the perfect food photography set, and forget about the food styling. Use the ingredients of your dish to style the dish. If the food doesn’t look good in real life, it doesn’t look good on camera as well. Take your time for styling your dish. Add some topping to make it look more appealing.
Always put the food as last on your food photography set because some food loses its freshness after a while, like soups and other hot food. Also sauces, ice cream, and whipped cream look all bad after a while. Use a dummy for preparing the food set.
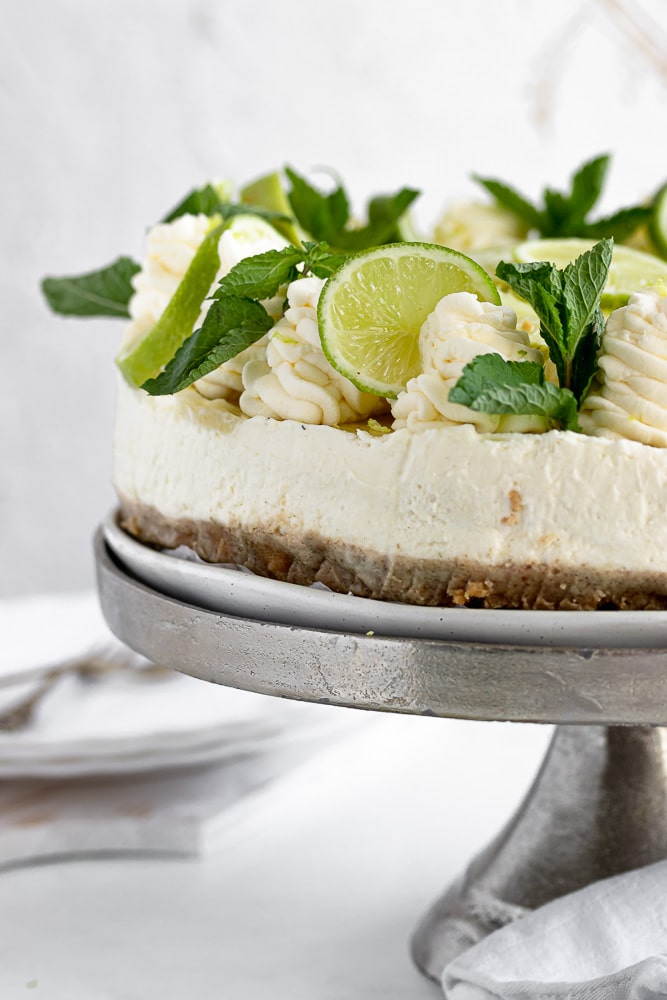
The no-bake mojito cheesecake above was just a normal no special flat cheesecake. By adding some whipped cream on top, adding some limes, and adding some mint, the cheesecake immediately looked special and appealing.
11. Use layers in your food photography setting
Another food photography tip for beginners is to use a lot of layers in your food photography setting. Layers are used to give a depth of field to your image, to create a three-dimensional effect, and make your hero stand out from all the rest. It also makes a photo more interesting.
Use layers not only in your food photography scene but also in your food styling. You can add layers into your food scene by adding toppings on your food, using crumbles, pinch bowls, napkins, old book sheets, baking paper, plates, cutting boards, ceramics, flowers, and glasses.
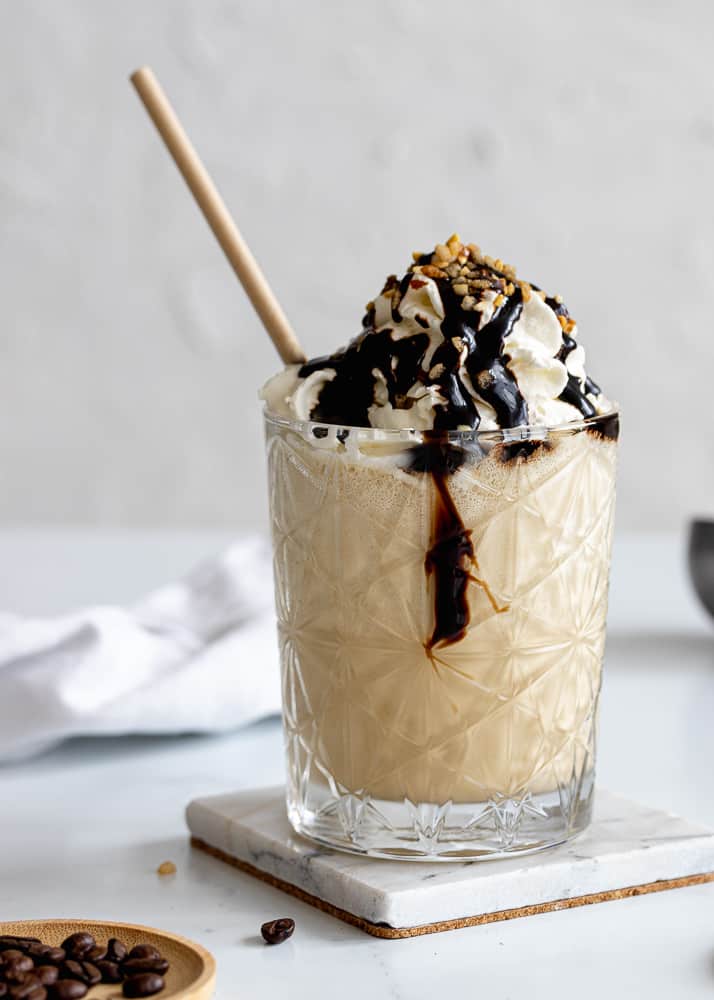
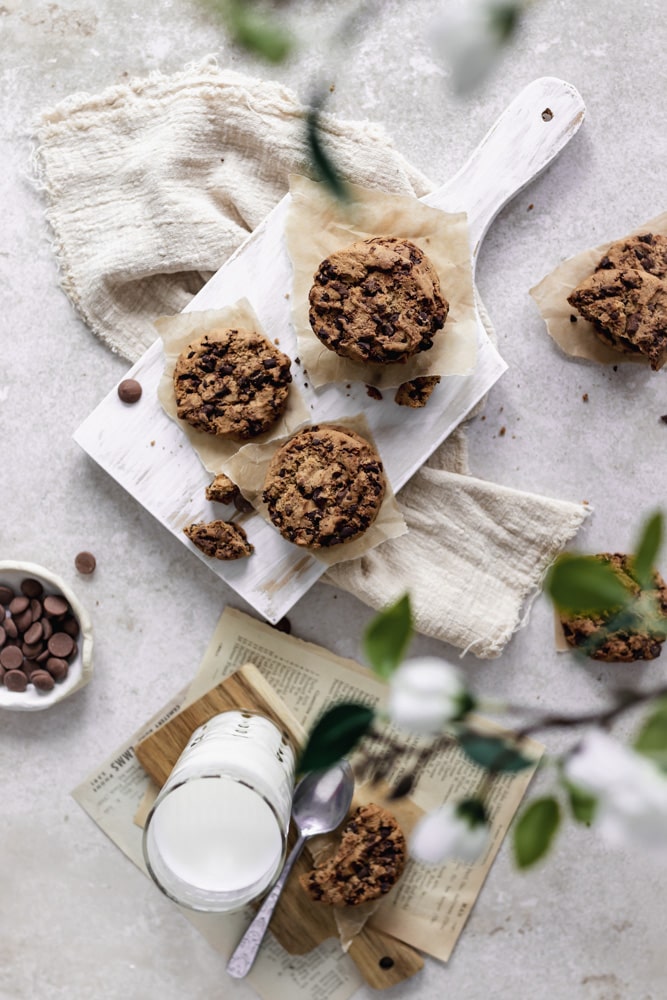
The food scene of the photo is quite simple, but I still used layers to make the photo more interesting. In the foreground, I placed a pinch bowl with some coffee beans. In the background, I placed a napkin. Even for the hero of this photo, I used different layers, coaster, drink, whipped cream, chocolate sauce, nougatine nuts, and a straw,
12. Make a beautiful mess
A food photo doesn’t have to be perfect. Create a ‘beautiful mess‘ in your food photo. You can do this by taking a bite out of the food, adding some crumbs around the food, or placing some ingredients in your food scene. But do it in a subtle way. Don’t make your food scene look like a big mess. A beautiful mess gives your photo more tension and makes it feel more like a real table setting. Look at other food photos that you love and look at how they made a beautiful mess in their food scene.
13. Think about your composition
To make your photo more exciting, balanced, and beautiful, it is wise to think about your composition while photographing food. In photography, composition means directing the viewer’s attention to a specific part of your photo.
You can do this by using one or more compositional rules in your food photo. The most used and easiest composition is the rule of thirds. Some other compositional rules are the rule of odds, lines, negative space, symmetry, and the golden ratio.
Note the composition guidelines are a guideline for your composition, not rules. Using compositional rules really helped me improve my photography.
14. Focus on the hero
Your food is the hero, make sure all the attention goes to the hero. You can do this by using the right composition and by focussing with your camera on your food. If you do this the hero becomes sharp, and the background becomes blurry (unsharp). If you don’t focus with your camera on something else than your food the food becomes unsharp and that is something you don’t want. There is an AF (Automatic focus) and MF (Manual focus) button on the side of your lens. Make sure in the beginning that it is put on AF.
15. Learn how to edit
First of all, I want to make clear that editing is super important in food photography. Editing is about 50% of a food photo. With editing, you can give your own style and feel to your photo. You can give a photo more contrast and make it more appealing. You can see the importance of editing in the before and after below.

If you are just starting out I understand that you don’t have your own editing style yet. Look at photos that you love, and look at what style of editing they have.
Editing software
My go-to editing program is Adobe Lightroom. I started out with a free version of Lightroom on my phone. Now I edit all my photos on my laptop with Lightroom Classic, which is part of the Adobe Photography plan. I have the photography plan with Lightroom Classic and Adobe Photoshop.
💡 TIP: in Lightroom, you can go to discover or tutorials to learn about editing. In Lightroom, you have tutorials specific to food photography. Here you can learn how you can edit a photo.
Practice a lot
One of the best tips that I can give you as a starter photographer is practice, practice, practice and it will become natural. You will learn every time you take photos of food. Be critical of yourself, and always look at what you can improve. Try also things out that you never have done before and learn how to do it. Challenge yourself and don’t play safe. That is the quickest way of learning food photography.
Inspiration
If you are just starting out, I understand that you don’t have found your own style yet. A great tip that I can give you for finding your own style is to go to Pinterest and look for food photos that you love. Save this in a special map. Look close to the photos and look at what kind of style the photographer has. Is it bright and airy or dark and moody? Look at the shadows and the highlights. The color of the backdrops.
Recommended food photography books for beginners
When I just started out with food photography I read the book How to Photograph food by Beata Lubas. In this book, Beata explains everything you need to know about food photography, from equipment to compositions, from light to editing. It’s a great resource with food photography tips for beginners.
There are also other great books about food photography. I listed them all below. Reading a book about food photography is a great place to start out if you are a beginner.
- Beata Lubas- How to Photograph Food
- Kimbely Espinal – Creative food photography
- Joanie Simon – Picture Perfect Food
Summary of the best food photography tips for beginners
There are a lot of things you have to consider starting out with food photography. But the most important thing is to start and practice a lot. First, start with the equipment you have and look for a place near a window with beautiful daylight and if necessary shape the light. Turn off your kitchen lights.
Secondly, if you have a DSLR camera or a mirrorless camera learn how to shoot manual and shoot in RAW format. Thirdly, look at what angle you want to shoot. Start with finding the right backdrops and place them on the place you want to photograph. Choose a composition. Place some props into your setting and make sure you make use of layers in your food photography setting. Use a dummy and make some beautiful mess. As the last put as last your styled food into the setting and make some photos. And last but not least edit all your food photos in Lightroom.
FAQ
Food photography is a type of still-life photography in which the photographer captures food or beverages, making them look appealing.
The goal of food photography is to capture the food or beverage in the most appealing way possible. As a food photographer, you need to showcase the uniqueness of a specific dish.
All you need for food photography is a camera, natural light, some props, and food. You can make all the photos in your own home and you don’t need a studio for food photography.
No, you don’t need a fancy camera for starting out with food photography. You can just start with the camera of your phone. There are a lot of food bloggers who only uses their phone. However, if you want to pursue a career in food photography I recommend you to upgrade to a DSLR or mirrorless camera.
The prime lens 50mm f/1.8is a great entry for food photography. It is a lightweight lens with a beautiful blur.
Other food photography tips
More resources on food photography
- The food photography youtube tutorials of Joanie Simon (The bite Shot)
- The food photography Youtube tutorials of Lauren Caris Short
- Food photography blog of Two Loves Studio
- Food photography blog of healthy lauren
This post contains affiliate links. This means that I may receive a commission if you make a purchase using these links, which help me run this site. You can read my affiliate policy here.